Amy's Treats
  • About
  • Custom Sugar Cookies
  • Contact
  • Blog

Save Your Fresh Herbs! Frozen Herbs in EVOO

11/14/2016

0 Comments

 
Anyone who knows me, knows:  I can kill any plant.  Any fish too, really, but this isn't a post about sushi.  Never thought I'd be able to say this one sentence...  "I had so much basil and oregano growing this summer, I didn't know what to do with it."  BUT I CAN, I AM, AND HERE WE ARE! 
Picture
Picture

WASTE NOT, WANT NOT, HERBIVORES

The bad news?  There's no real great way to extend the shelf life of fresh herbs beyond a couple of days once you've picked or snipped them.  

The worse news:  You have to cut plants back or they'll spiral into the black hole of not-growing-anymore-dom.

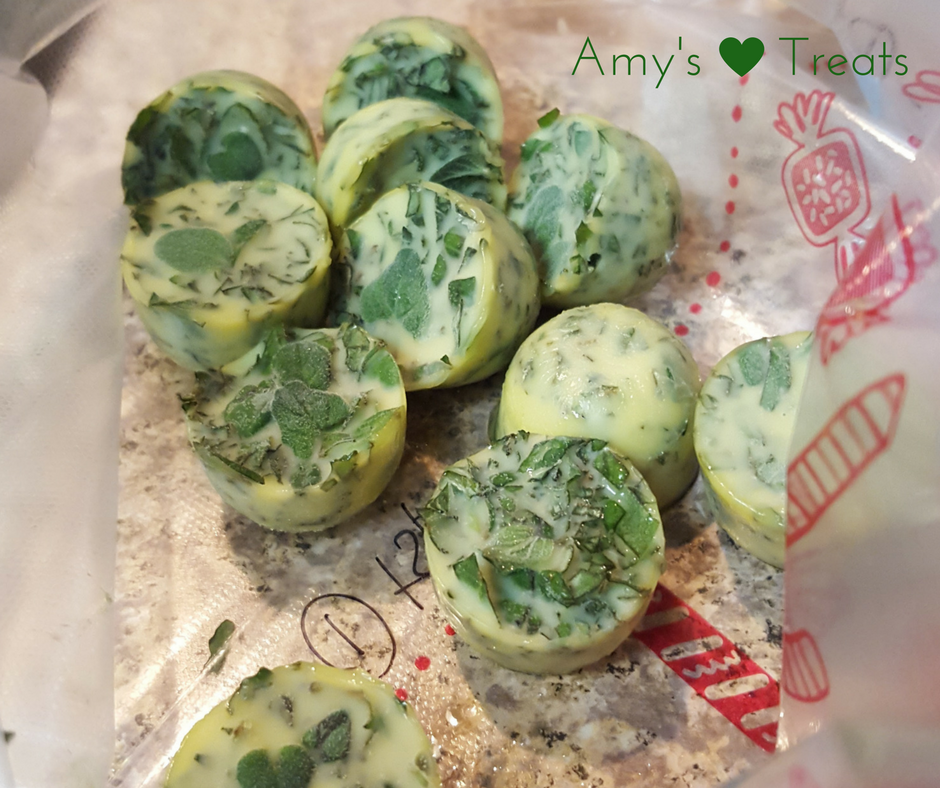
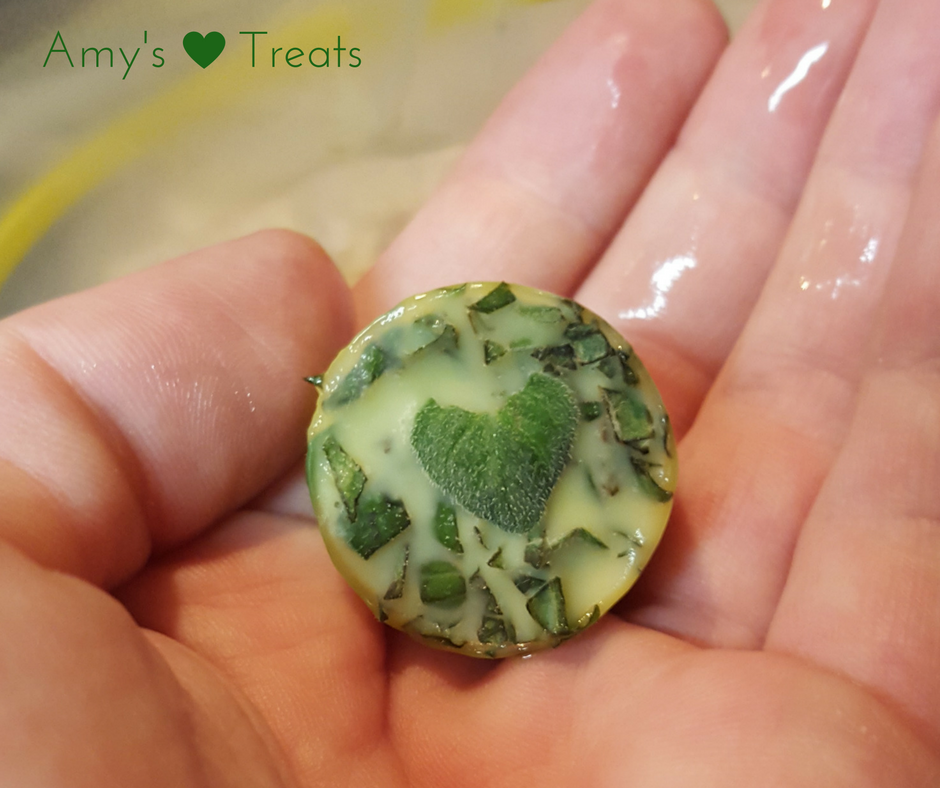
GOOD NEWS:  You can save your precious homegrown (or store-bought fresh) herbs almost indefinitely with just a few minutes on a slow afternoon.  All you need is the herbs of your choice and the freezing medium of your choice.  My medium for herbs is EVOO.  I love EVOO.  I swear, I'd drink it.  It's perfect for this application because I can pop a couple of these little rock stars into a pot or a pan and start my recipe with exactly what I need (oil + herbs)!
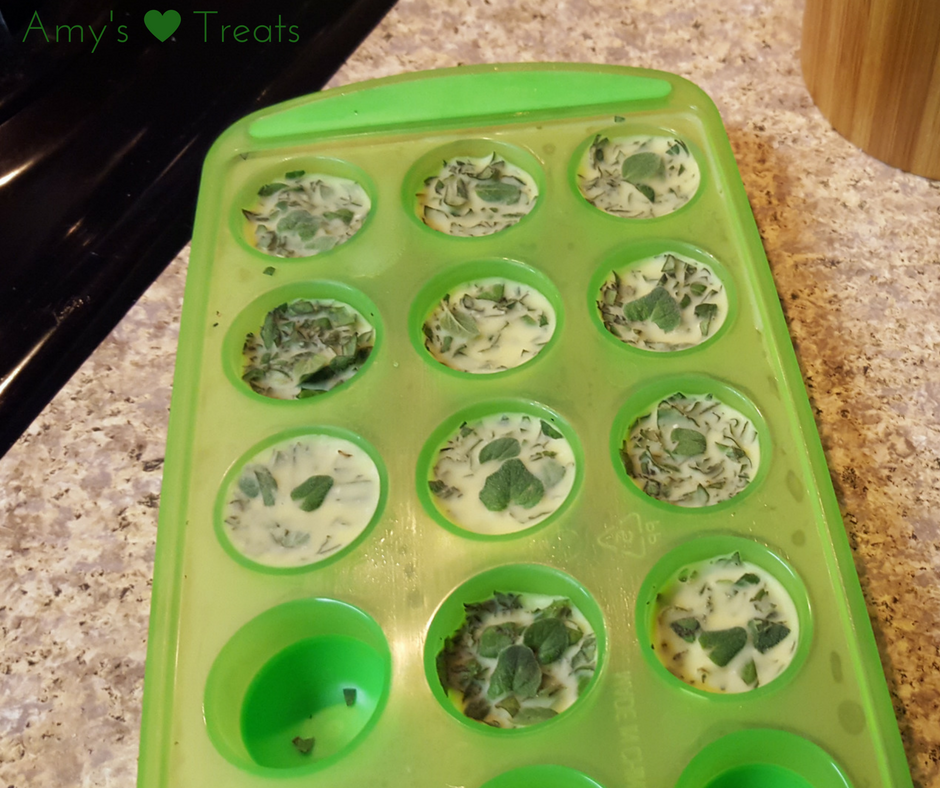
Picture
WHAT YOU NEED
  • Herb(s) of choice (I used oregano)
  • Freezing medium of choice (Extra Virgin Olive Oil for me!)
  • Ice cube tray
It's really as easy as it sounds!  Here's what you do: Chop up your herbs.  Put them in your ice cube tray.  Cover with freezing medium of choice.  Put in freezer to freeze.  You're done!

You don't HAVE to use these in hot applications, either.  We all start a great homemade Italian Marinara Sauce recipe with olive oil and oregano (among other things), right?  But what if you preserved your fresh cilantro this way?  Pop a couple out of the freezer as you're prepping your guacamole & you're good to go! 

Note:  This isn't rocket science (thankfully).  You can chop and freeze all willy-nilly and I won't be judging you.  For me, though? For these?  I did measure.  1tsp of oregano per cube, that way I know how much I'm using in a recipe down the road.  But go on, you do you. 
Picture
0 Comments

DIY Mirror Cake

11/6/2016

0 Comments

 
Mirror glaze cake with decorations.
I don't like cats. I've never liked cats.  I'd never liken myself to a cat.  Except, I'm about to.  I LOVE BRIGHT, SHINY OBJECTS!  Enter: Mirror Cakes.  Me-ow!  Remember the first time you saw a mirror cake?  I do.  I raced to the Google machine IMMEDIATELY, intent on replicating this cakey sorcery. I couldn't find a recipe ANYWHERE!  This thing was completely.locked.down.  After a hefty amount of searching, I got frustrated and threw in the towel.  Sorry, mirror cake. You just aren't for me. 

Fast forward to this past week.  Here I am, watching YouTube videos about royal icing, cookie decorating, and marshmallow fondant (JUST SHOW ME ALL OF THE THINGS!).  The video I was on ended and the next auto-played.  Lo and behold, the next vid just so happened to be about MIRROR CAKES!  Not only about them, but about how easy they are to make! At home! By yourself! AAHHHHHHH.  Thank you, Elise.  Thank. You. ?

Full disclosure: This post isn't a complete step-by-step tutorial with an included recipe.  If you want the live action video of all that, please click on the video by Elise linked above.  Here, you'll find the basics, some observations, and my first attempt at mirror glaze cakery.  Let's do it! 

First thing's first - You cook the glaze.  It's not pretty or exciting, so no pics of that.  After you cook it, you have to let it come down to the correct temp before applying it to the cake.  Mirror cake will not be mirror cake if the mirror runs completely off when applied -that's what happens if you don't let it come to temperature.
Let your mirror glaze cool to the correct temperature before glazing your cake.
While I waited, I walked the dogs.  I called a friend.  I did the dishes.  I ran errands. I cut up an apple.  I watched other videos.  I looked up recipes.  I folded laundry.

Letting the mirror glaze cool down took approximately FOREVER.  And by that I mean, it took a couple of hours.  It probably didn't help that the bowl was covered with plastic wrap, thereby holding the heat in, but I didn't want the glaze to form a skin if left uncovered.

Mirror glaze, mirror glaze, on the counter, who's the ... wait, what rhymes with counter?! 

Another good thing to do while you wait is to level your cake. You'll put the cut side down so the baked (smoother) side gets the glaze on it, but this will ensure you have a level cake. 

You could eat the part you cut off.  And really, who wouldn't?  I'm the weirdo who doesn't like red velvet cake (don't hate me), so I saved it for additional glazing practice. 

Note:  Something as thin as the top layer will not hold up well to the glaze. I suggest you don't glaze anything of size that is so thin, or you're going to be very disappointed when you try to move it.
Level your cake so it's flat and pretty.

Read More
0 Comments

    Categories

    All
    Baking
    Bread & Bread Substitutes
    Breakfast Treats
    Condiments & Spices
    Cookies
    Dips
    Fruit
    Grain Free Goodies
    Greek Yogurt
    Healthy Snacks
    Holiday Treats
    Kitchen Tips
    Paleo
    Party Time Treats
    Protein Treats
    Side Dishes
    Sinfully Good Sweets
    Tasty Grains
    Vegan
    Vegetables
    Vegetarian

    Amy & Her Treats

    Hi. I'm Amy, and I love treats (Hi, Amy!).  Salty treats. Sweet treats. Healthy treats. Decadent treats. Wheat-free treats. Dog treats. Meaty treats.  I might need 12 steps.

    There's only one way to feed the treat craving: COOK!  Here you will find many of my creations, kitchen tips and tricks, healthy eating secrets, a few indulgences, kitchen gadget reviews, and more.

    Thanks for checking out my treats!  Want to shoot me an email? It's easy: AmysTreats@outlook.com

    Amy Barton
    View my profile on LinkedIn

    Archives

    August 2020
    November 2016
    October 2016
    April 2014
    March 2014
    February 2014
    January 2014

    RSS Feed

    Tweets by @AmysTreats

Powered by Create your own unique website with customizable templates.